


The Scrunchie
If you're like me, you hate to waste! And fabric scraps, we accumulate a lot when we sew !
That's why I am sharing this simple and easy tutorial with you to recover your leftover fabrics.

Materials needed for this project
- Fabric with a dimension of 4.5" X 18". You can use stretch fabric (stretch velvet in this case) as well as a non-stretch fabric (100% cotton). If you are using a non-stretch fabric, it will be very important to take the exact measurements to make this project.
- If you have thin hair or those who prefer a more discreet scrunchie, use the dimensions: 3" X 18".
- Ruler
- Thread to match your fabric
- Scissors
- Sewing Pins, Safety Pins
- Marker or Chalk Pen
- ¼" wide flat elastic. You can also take up to ½ ".
** Please note that measurements here are in inches and may be shown with the following abbreviations: in and "
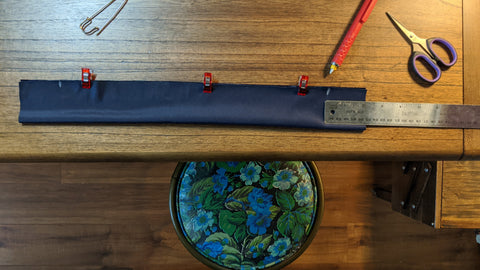
Step 1
Cut out a rectangle of 4.5" by 18"

Step 2
Fold the fabric right sides together and draw a mark at each end at 1.5" using your marker (chalk)
Step 3
Sew with a zigzag stitch (stretch fabric) or a straight stitch (non stretch fabric) 1 cm from the edge and between the 2 chalk lines made in the previous step.
Then, fix the safety pin on top of the scrunchie and turn your fabric wrong side together by inserting the safety pin on the inside of the tube and turning it around.


Step 4 - Finishing the tube
Pin your fabric together, the 2 ends of the tube right sides together and sew a straight seam.
Cut off the excess fabric. You have a tube now.


Step 5: Inserting the elastic
Cut a 7-inch piece long of elastic.
Using a safety pin again, insert the elastic inside the tube.
Then put the 2 ends of rubber bands on top of each other (about ¾ inch) and sew with a zigzag stitch (I sew on it twice to be sure it’s fixed properly) in the same direction as on the second picture.
** Please note that you will need to adjust the width of your zig-zig stitch according to your elastic width.


Final step
Pin the 2 surfaces together. Close with a straight stitch. For a better looking finish, it is important to sew as close to the edge as possible. If you want, you can also blind stitch your scrunchie by hand, it takes more time and patience.


